


Call us NOW

Kitchen Torch Culinary Guide: Techniques and Uses
A kitchen torch, known in professional kitchens as a culinary torch or chef’s blowtorch, is a handheld butane-powered device that produces a focused, adjustable flame used to finish dishes with precision heat. The flame reaches between 2,000°F and 3,000°F, making it one of the most direct heat tools available to home cooks. Unlike an oven broiler or stovetop burner, a culinary torch gives you directional control over exactly where the heat lands. That precision is what makes it indispensable for caramelizing the sugar crust on crème brûlée, searing sous vide steaks, and charring cocktail garnishes. If you want to understand what a kitchen torch culinary tool actually does and how to use one correctly, this guide covers every application, technique, and safety consideration you need.
What are the primary culinary uses for a kitchen torch?
A culinary torch is a finishing tool for multiple applications, not a primary cooking device. That distinction matters. You use it after the main cooking is done to add texture, color, and flavor that other heat sources cannot replicate with the same control.
The most common applications include:
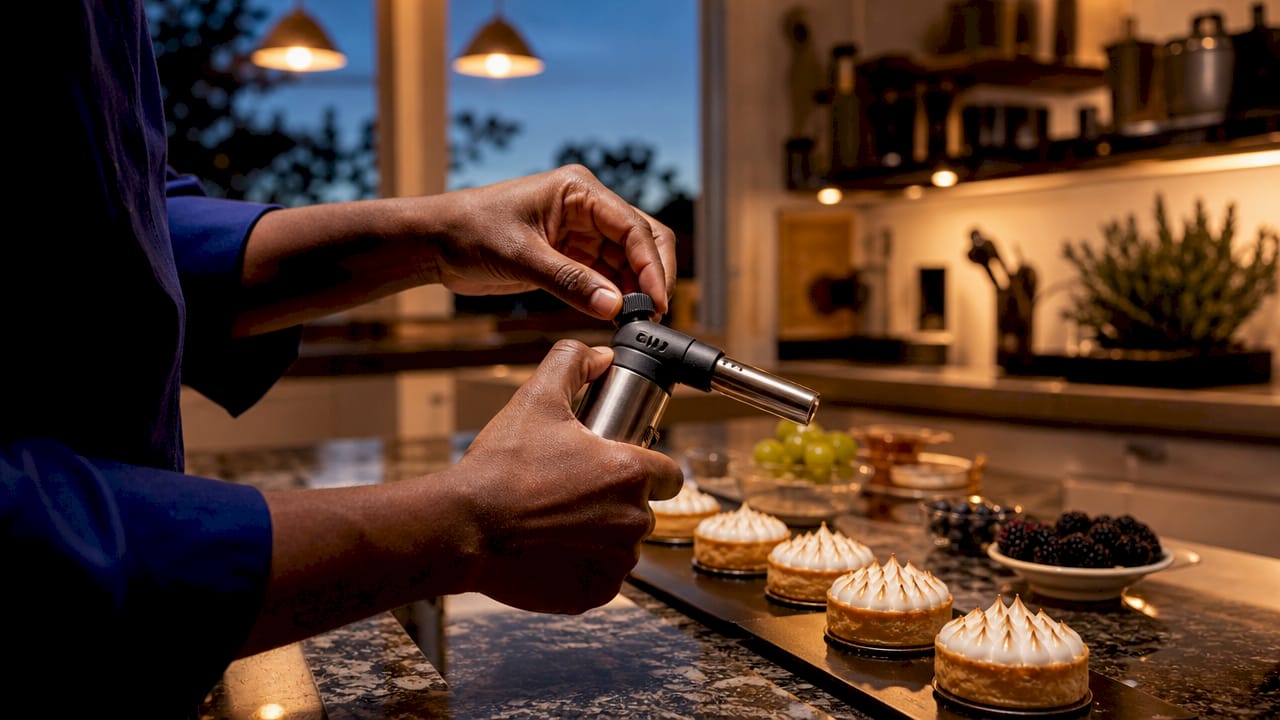
- Caramelizing sugar on desserts. The classic crème brûlée crust is the benchmark use case. A thin layer of granulated sugar transforms into a glass-like amber shell in under 60 seconds with a torch. The same technique works on fruit tarts, custards, and even cocktail rims.
- Searing pre-cooked meats. Sous vide cooking produces perfectly cooked protein with no exterior crust. A torch solves that problem by triggering the Maillard reaction on the surface without raising the internal temperature.
- Charring vegetables and peeling skins. Tomatoes, bell peppers, and jalapeños char quickly under direct flame, loosening skins for easy removal and adding a smoky depth that roasting in an oven rarely matches.
- Toasting meringue. Lemon meringue pie and baked Alaska both benefit from the torch’s ability to brown peaks and valleys of meringue without heating the filling underneath.
- Melting and browning cheese. French onion soup, nachos, and open-faced sandwiches get a restaurant-quality browned cheese finish in seconds.
- Smoky cocktail garnishes. Bartenders use culinary torches to char citrus peels, toast spices, and add smoke to cocktail presentations. The technique has moved from craft bars into home entertaining.
Adjustable flame control is what makes one torch handle all of these tasks. Low flame for delicate meringue browning, high flame for aggressive searing. A torch without a reliable flame adjustment dial limits your range significantly.
Pro Tip: When caramelizing sugar, use superfine sugar instead of standard granulated. It melts faster and more evenly under the torch, reducing the risk of scorching one spot while another stays raw.
How to use a kitchen torch correctly: techniques and safety tips
The most common beginner mistake is using the torch on raw food instead of finishing pre-cooked items. A culinary torch is not a substitute for a pan or oven. It adds a final layer of texture and color to food that is already cooked through.
Follow these steps for correct torch technique:
- Dry the surface first. Pat meat dry with paper towels before applying the torch. Surface moisture turns to steam and prevents proper browning. The same rule applies to cheese and sugar toppings.
- Establish a stable blue flame. Ignite the torch and adjust until the flame is steady and predominantly blue. The yellow tip of the flame contains unburnt gas. Using the blue flame portion avoids incomplete combustion and the chemical off-flavors it leaves on food.
- Hold the torch 2 to 4 inches from the food. Maintaining this distance prevents burning and keeps unburnt butane from contacting the food surface. Too close and you scorch. Too far and you lose efficiency.
- Keep the torch moving. Use sweeping circular motions rather than holding the flame in one spot. A stationary flame creates hot spots that burn before the surrounding area browns.
- Work in short passes. Searing a steak surface takes 30 to 60 seconds per side with consistent motion. Sugar caramelization takes even less. Stop and assess between passes rather than torching continuously.
- Refill safely. Cool the torch completely before refilling with butane. Press the canister firmly in short bursts to avoid pressure buildup. Never refill near an open flame or heat source.
- Store with the safety lock engaged. Every quality culinary torch has a child-safety lock. Use it. Store the torch upright in a cool, dry location away from direct sunlight.
Pro Tip: After torching meat, let it rest for 30 seconds before cutting. The surface stays hotter than the interior immediately after torching, and resting allows the crust to set without losing juices.
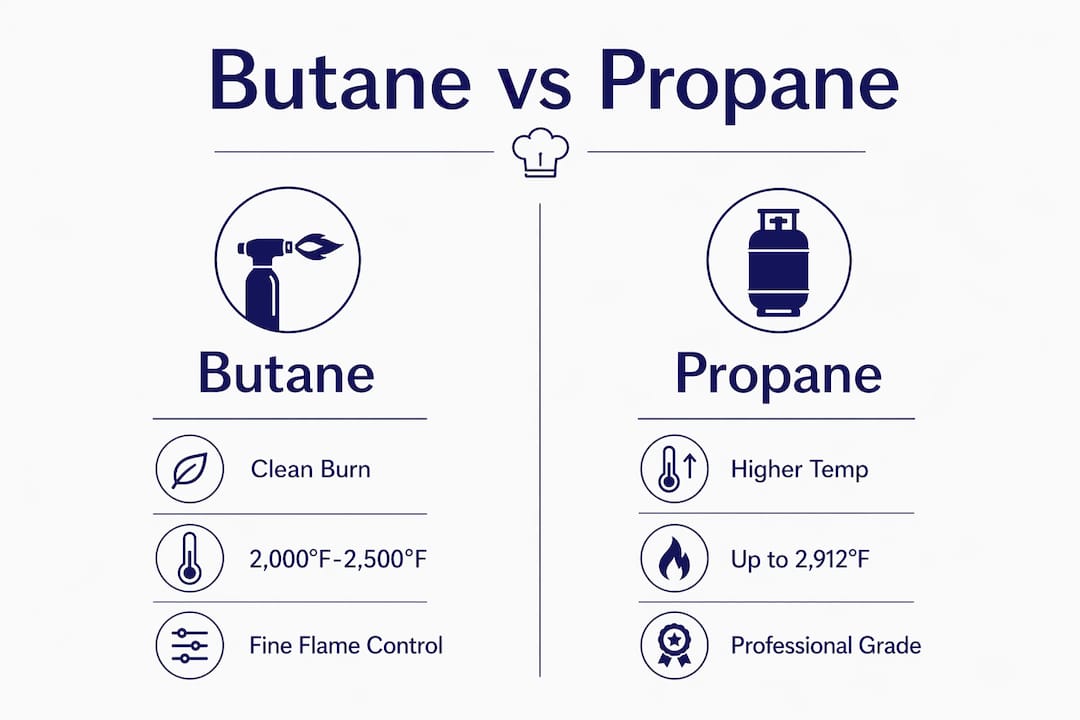
Butane vs. propane: comparing kitchen torch types
Not all culinary torches operate on the same fuel or serve the same purpose. Choosing the right type depends on what you cook, how often you cook it, and whether you need portability or raw power.
| Feature | Butane culinary torch | Propane torch |
|---|---|---|
| Flame temperature | 2,000°F to 2,500°F | Up to 3,600°F |
| Flame control | Precise, adjustable | Less refined |
| Best use | Crème brûlée, meringue, cheese | Large cuts, outdoor searing |
| Size and portability | Compact, handheld | Bulkier, heavier |
| Fuel availability | Specialty butane canisters | Hardware stores, widely available |
| Torch taste risk | Low with correct technique | Higher due to intensity |
Butane kitchen torches are preferred for home use because they burn cleaner and offer finer flame control than propane alternatives. Propane torches run hotter and work better for large cuts of meat or outdoor applications where precision matters less than raw heat output.
For professional-grade searing without any torch taste risk, the Searzall attachment is worth knowing about. The Searzall provides diffused infrared heat through a mesh panel that spreads the flame evenly across a wider surface area. This eliminates hot spots and produces a uniform crust on sous vide proteins that rivals a cast iron sear. It attaches to a standard propane torch head and is the tool of choice in high-volume gourmet kitchens.
For most home cooks, a quality butane torch with an adjustable valve and a stable ignition mechanism covers 90% of culinary torch applications. Look for models with a non-slip grip, a visible fuel window, and a safety lock that actually works under regular use.
Top dishes that benefit from kitchen torch techniques
The culinary torch earns its place in a home kitchen through the specific results it delivers on dishes where no other tool performs as well.
- Crème brûlée. The defining torch dish. A thin sugar layer caramelizes into a crackling amber crust that a broiler cannot replicate without warming the custard underneath.
- Lemon meringue pie and baked Alaska. The torch browns the meringue peaks to a toasted finish while leaving the filling cold and intact. Broiler heat penetrates too deeply for these applications.
- Sous vide steak and salmon. After a water bath cook, the exterior is gray and unappetizing. Two passes with a torch on each side creates a proper Maillard crust without overcooking the interior.
- French onion soup. The gruyère on top gets a properly blistered, browned finish that a microwave or oven broiler produces inconsistently.
- Charred tomatoes and peppers. Direct flame chars the skin in under two minutes, adding smokiness to salsas, romesco sauce, and roasted pepper dishes that oven roasting takes 20 minutes to achieve.
- Torched oysters and scallops. A quick pass over raw oysters with herb butter or a finish on seared scallops adds a caramelized top layer that elevates the presentation and flavor simultaneously.
- Cocktail garnishes. Torching a rosemary sprig, a cinnamon stick, or a citrus peel releases aromatic oils and adds visual drama to craft cocktails. This technique has become a standard in home entertaining.
The Maillard reaction is the chemistry behind most of these results. It occurs when proteins and sugars on a food surface react under high heat, producing hundreds of flavor compounds and the brown color associated with properly cooked food. A culinary torch triggers this reaction with precision that ovens and broilers cannot match on already-cooked food.
Key takeaways
A culinary torch is a finishing tool that triggers the Maillard reaction and caramelization with directional heat, producing results that ovens and broilers cannot replicate on pre-cooked food.
| Point | Details |
|---|---|
| Definition and purpose | A culinary torch is a handheld butane device for finishing dishes, not primary cooking. |
| Flame temperature | Flames reach 2,000°F to 3,000°F, requiring controlled distance of 2 to 4 inches from food. |
| Avoid torch taste | Use only the blue flame and keep the torch moving to prevent unburnt gas contact with food. |
| Butane vs. propane | Butane torches suit home use for precision tasks; propane and Searzall suit high-volume searing. |
| Top applications | Crème brûlée, sous vide searing, meringue, charred vegetables, and cocktail garnishes. |
Why the kitchen torch deserves more credit than it gets
I have watched home cooks spend hundreds of dollars on immersion circulators and sous vide setups, then serve gray, unappetizing protein because they skipped the sear. The torch is the missing step, and it costs a fraction of the other equipment. That imbalance frustrates me every time I see it.
The learning curve on a culinary torch is genuinely short. Most people get usable results within the first two or three attempts. The mistakes that do happen, holding the torch too close, using the yellow flame, torching wet surfaces, are all fixable once you understand why they cause problems. The gap between home and professional cooking narrows considerably when home cooks have the right finishing tools.
My recommendation is to invest in a torch with a visible fuel gauge and a solid flame adjustment valve. Cheap torches with unreliable ignition or no flame control create inconsistent results and build bad habits. You do not need to spend a lot, but you do need a torch that behaves predictably. Check the food prep tools category at Culinaryprofis for options that meet that standard without overcomplicating the selection.
The aesthetic payoff is real. A properly torched crème brûlée or a seared sous vide steak looks and tastes like restaurant food. That result is worth the 15 minutes it takes to learn the technique correctly.
— John
Get professional-grade culinary torches at Culinaryprofis
Culinaryprofis stocks professional culinary equipment built for serious home cooks and commercial kitchens alike. The selection includes butane torches with adjustable flame control, safety locks, and the precision construction that makes consistent results repeatable.

Beyond torches, Culinaryprofis carries the full range of equipment that complements torch cooking: commercial-grade grills, built-in burners, and food prep tools designed for durability and performance. If you are building a kitchen setup that performs at a professional level, browse the full catalog at Culinaryprofis. Free shipping, a flexible return policy, and expert support make it the practical choice for culinary enthusiasts who want equipment that lasts.
FAQ
What is a kitchen torch used for in cooking?
A kitchen torch is used to finish pre-cooked dishes with direct, high-intensity heat. Common applications include caramelizing sugar on crème brûlée, searing sous vide meats, toasting meringue, and charring vegetables.
How do you avoid torch taste when using a culinary torch?
Torch taste comes from unburnt butane gas contacting food. Use only the stable blue flame, hold the torch 2 to 4 inches from the food surface, and keep the flame moving to prevent gas buildup on the food.
What fuel does a culinary torch use?
Most culinary torches use refined butane, which burns cleanly and provides precise flame control suited for delicate tasks. Propane torches are an alternative for higher-heat applications but are less common in home kitchens.
Can you use a kitchen torch on raw meat?
A culinary torch is not designed to cook raw meat through. It functions as a finishing tool to sear the exterior of pre-cooked protein, triggering the Maillard reaction for color and flavor without altering the internal cook level.
What is the Searzall and when should you use it?
The Searzall is an attachment that fits a propane torch and diffuses the flame through an infrared mesh panel for even, uniform searing. It is best suited for high-volume cooking or professional applications where consistent crust development on sous vide proteins is the priority.